The FLink tool has been retired. Please consider using the Entrez Utility (EUtilties) to create your own scripting solution https://www.ncbi.nlm.nih.gov/books/NBK25501.

 FLink Help


This help document describes how to use FLink, including detailed descriptions of input required, output displays, and the program's features and functions. The "How To" page provides quick start guides for some common types of searches.


BRIEF TABLE OF CONTENTS
 
  What is FLink icon FLink?
frequency-weighted links
Quick start guide
1-2-3 step process illustration
Input options
direct input of UID list into FLink
search Entrez → link to FLink
maximum input 100,000 UIDs
Review input summary + select destination
UID list processed
folder tab functions, icon for the LinkTo function, which retrieves a frequency-weighted list of records, from a destination database of choice.  This function acts upon all the records in the folder tab, whether or not their checkboxes are activated. LinkTo
close folder tab
start over
Output
job summary
ranked list of records
folder tab functions, icon for the Download CSV function, which saves all items in the current folder tab, whether or not they have been selected with checkboxes.save CSV file
maximum output 100,000 UIDs
Supported databases
subset of Entrez
link names
FLink icon in Entrez search results
References


What is  FLink icon FLink? back to top

FLink icon FLink is a tool that enables you to traverse from a group of records in a source database (e.g., Proteins) to a ranked list of associated records in a destination database (e.g., BioSystems).

The name "FLink" is based on the German word meaning nimble, swift, agile, reflecting the tool's purpose to process large quantities of input and output (up to 100,000 UIDs in each) in an efficient and meaningful way. The name is also an abbreviation for "frequency-weighted links" because the records in the destination database are ranked by the number of items from the source database to which they are linked, as shown by the "frequency" column in step 3 of the quick start guide illustration, below.

A list of supported databases is also provided in this document.


Quick Start Guide back to top

  The illustration below shows the easy, 1-2-3 step process for using FLink icon FLink. It uses a sample input file of 417 protein sequence unique identifiers (UIDs) and retrieves a ranked list of biosystems that contain proteins from the input list. Click on any panel of the image below to link to subsequent sections in this help document, which provide additional details about the proper formatting of the (1) input UID list and the features of the (2) review + select display and (3) output display.  

Title banner for the Quick Start Guide illustration, which shows the three easy steps in using FLink.  The featured example shows how to import a list of protein sequence GI numbers and retrieve a ranked list of BioSystems that contain those proteins. Click on this banner to open the sample input file of 417 protein GI numbers that was used to generate the step 1, 2, and 3 illustrations below. Save the file to your computer and import it into FLink to try the example yourself.
 
Step 1 in using FLink: Select the desired starting database and input a list of UIDs.  Click on this graphic to read more details about input formats and options. Step 2 in using FLink: Review your input list and use the LinkTo menu option to select a destination database.  Click on this graphic to read more details about this display, the JobID you'll receive after using the LinkTo option, and folder tab functions. Step 3 in using FLink: View the output, which displays a ranked list of records from destination database. The frequency column shows the number of items from your input list that are linked to each retrieved record. Click on this graphic to read more details about the output display, its folder tab functions, and options to save the input and/or output list as a CSV file.
 
If you would like to try this example yourself, save the sample file of 417 protein sequence UIDs that was used for this illustration to your computer. Then open the FLink icon FLink home page, select "Protein" as the start database, upload the file, and follow the remaining steps illustrated above. (A corresponding textual step-by-step guide is provided in the guide on: "How to start with a list of proteins and find the biosystems in which they are involved.")


Input Options back to top

| direct input of UID list into FLink | search an Entrez database and then link to FLink | maximum input |
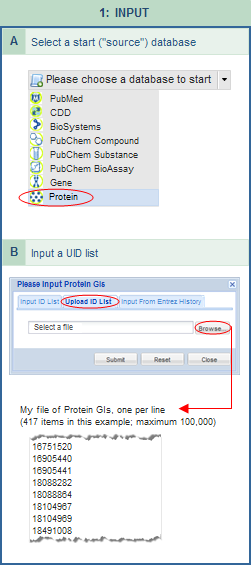
Direct input of UID list into FLink icon FLink back to top


Example of data input into FLink, in this case, a list of protein sequence unique identifiers (UIDs).  Data input is step 1 of a three step process in using the tool. Click on this image to see the complete illustration of the three steps in using FLink, featured in the Quick Start Guide.
One method of using FLink icon FLink is to input a list of unique identifiers (UIDs) from any one of the supported databases directly into the tool. Valid UIDs are integers only, and the current range of acceptable is 0 to 4294967295. The input list should contain no alphanumeric combinations or other non-integer characters. For example, the GI numbers of sequence records are allowable but the accession numbers are not. As another example, if your input UIDs are for biosystem records, they should be formatted as digits only, e.g., 82991 not bsid82991. (Tip: the Batch Entrez tool can be used to screen your input list to identify obsolete and otherwise invalid IDs, if desired.)

  • Choose database to start ("source database") back to top

    • This menu lists the supported databases and allows you to indicate what type of data (proteins, genes, etc.) are represented in the UID list that you will input into FLink. Your selection will appear as the "source database" in the job summary panel of FLink's output.

      Note: After you select an initial database and input a UID list, it is possible to continue using the "choose database to start" menu to select additional source databases, each of which will open in a separate folder tab on the input summary display. You can then use the LinkTo option in any folder tab to traverse from that data set to a ranked list of related data in a destination database. If you want to clear your input, you can either close an individual folder tab or use the start over button to close all the folder tabs and clear all input lists. (Although multiple folder tabs can be opened on the data input page, FLink currently displays only one folder tab on the output display.)

  • Data input (100,000 UIDs maximum) methods: back to top


    • Input ID List -- Type or copy/paste UIDs directly into the dialog box. If UIDs are input in this way, they must be separated by white space or commas with no carriage returns between them. The UIDs should be from a supported database and should be written as integers only. Additional details about valid UIDs are provided above, and the Batch Entrez tool can be used to screen your input list to identify obsolete and otherwise invalid IDs, if desired.


    • Upload ID List -- Browse your computer for a file of UIDs and submit the file to FLink. If UIDs are input in this way, there must be one UID per line, with no commas or white space. The UIDs should be from a supported database, and should be written as integers only. Additional details about valid UIDs are provided above, and the Batch Entrez tool can be used to screen your input list to identify obsolete and otherwise invalid IDs, if desired.


    • Search Entrez -- Enter an Entrez query to do a search in the start database you have selected. The records retrieved by the search will be imported automatically into FLink and will serve as the input list for your FLink operation. (As an example, open FLink and select Entrez Gene as the start database. Select "Search Entrez" as the input method and enter a query string such as: human[organism] AND colon cancer. Once the retrieved genes are displayed in FLink, select "LinkTo: gene_biosystems" to see a list of biosystems, ranked by the number of genes they contain from the input list. While viewing the biosystem list, click on any value in the "frequency" column to see which subset of genes is associated with the corresponding biosystem.) The Entrez help document provides general information on searching in that system, and database-specific help documents (e.g., PubMed, CDD, BioSystems, PubChem, Structure, Gene, Protein) provide additional tips on searching those particular databases.


    • Input from Entrez History -- If you have done an Entrez search in one of the supported databases within the last 8 hours, the Entrez system has saved the UID list from your search results in Entrez History, and you can use the "input from Entrez History" option in FLink to import the UID list from a search. (More technically, the searches you have done in a given Entrez database are saved in Entrez History for 8 hours after the last activity you've had in that database.)


Tip: You can use Batch Entrez, if desired, to screen a UID list and identify obsolete or otherwise invalid UIDs. Be sure to select the appropriate database from the pull-down menu at the top of the page, then "Browse" to find the file of UIDs you'd like to upload, and press "Retrieve." Batch Entrez will then display a report summarizing the data it found in your input file, such as: (1) number of lines that were present in the file (there should be one UID per line); (2) rejected lines (indicating how many invalid UIDs were detected); (3) removed duplicates (indicating how many duplicate UIDs were detected/removed); (4) passed to Entrez (indicating how many of the UIDs from your list are valid and will therefore be acted upon). The latter may include obsolete UIDs that have been superceded by newer UIDs. The obsolete UIDs, as well as any invalid UIDs that were present in your file, are explicitly reported at the top of the Batch Entrez report. You can revise your UID list file on your computer based on that report, if needed, before importing into FLink.


Example of the FLink display that allows you to review your input and select a destination database. This is step 2 of a three step process in using the tool. Click on this image to see the complete illustration of the three steps in using FLink, featured in the Quick Start Guide.
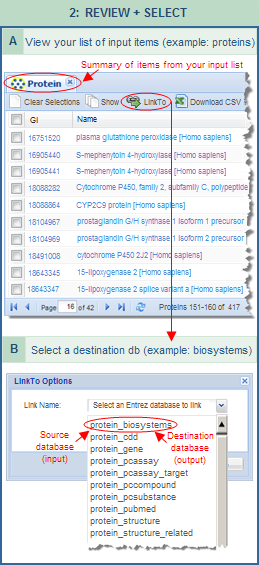
  • Input summary display:  REVIEW input + SELECT destination database back to top

    After you input a UID list directly into FLink, you will see an intermediate display such as the one illustrated here that summarizes your input and allows you to LinkTo a destination database. (If you access FLink by starting with an Entrez Search instead of inputting a UID list directly, you will not see this intermediate display. Any FLink icon FLink icons that appear on the Entrez search results page will take you directly to FLink's output display.)


    • UID list processed -- After you input a UID list into FLink, the tool checks your list to ensure all the UIDs are valid.

      • If all the UIDs are valid, FLink will ignore duplicate UIDs and will open an input summary page such as the one shown in the illustration to the right. Note that it lists the items in order of increasing UID, regardless of the order in which they were input into the system.


      • If the input list contains any invalid UIDs, FLink will display an error message (e.g., "Failed to Get List. ERROR:The input file contains invalid UID(s), which cannot be processed by FLink..."). In such a case, remove the invalid UIDs from the input list and submit the job again. (See the tip on using Batch Entrez to check the UIDs in your list.)

    • Descriptive information displayed -- FLink retrieves descriptive information from Entrez about each valid UID in your list and presents it on the summary page for your review. Note: If your input list contains any UIDs that fall within the acceptable range of integers, 0 to 4294967295, but do not correspond to available database records, these UIDs will appear in the input summary folder tab but no descriptive information will be displayed for them.


    • Folder tab functionsback to top


    • As noted in the section on choosing a start database, it is possible to have multiple folder tabs open in the input summary display, one for each starting database. Each folder tab will have the following options:
      • icon for the Clear Selections function, which clears all selections on all pages within the folder tab. Clear Selections -- Clear of the all checkboxes that have been selected on all pages within the folder tab. (Note: It is possible to select items on multiple pages (1 of 10, 4 of 10, 9 of 10, etc.) within a folder tab, and the "clear selections" function will clear the checkboxes on all the pages.)


      • icon for the Show function, which displays all (default) or selected records in the Entrez database. Show records in source database -- Retrieve all (default) or selected items from the corresponding Entrez database. This function will temporarily take you out of FLink and into that Entrez database, but you can use the browser's back button to return to the FLink display.


      • icon for the LinkTo function, which retrieves a frequency-weighted list of records, from a destination database of choice.  This function acts upon all the records in the folder tab, whether or not their checkboxes are activated. LinkTo -- This is the main function of the FLink tool, and it acts upon all the records in the folder tab, whether or not their checkboxes are activated. It allows you to select your desired destination database and data type, represented as a "link name." For example, if you are starting in the Protein database, the "Link Name" menu will include choices such as "protein_biosystems," "protein_cdd," "protein_gene," "protein_structure," etc., where the second part of each term indicates the destination database. Some destination databases might have several options, for example, "protein_structure" and "protein_structure_related." To learn the difference, just select an option to read its description in the "LinkTo Options" dialog box. You can continue browsing the various LinkNames in that way, then press the "submit" button in the dialog box once you've selected the LinkName of interest to you.


        • Job ID: After you select a "LinkTo" option and press the "Submit" button, a randomly generated job ID will be displayed in the URL (e.g., https://www.ncbi.nlm.nih.gov/Structure/flink/flink.cgi?cmd=getjob&&jobid=237915522). That job ID, and hence the URL, will remain valid for 24 hours and can therefore be used to retrieve the results of a job during that time period.

          A separate job ID is assigned to each LinkTo operation. For example, if you import the sample list of 417 protein UIDs into FLink and select "LinkTo: protein_biosystems," the URL that appears on the output page of ranked biosystems will include a randomly generated job ID. Save the URL if you want to retrieve those results within the next 24 hours. If you then want to select another LinkTo option for the same input list, use the browser's back button to return to input summary page and select a new destination option such as "LinkTo: protein_gene." A new job ID for that "LinkTo" operation will appear on the output page, which can also be saved and used over the next 24 hours.


        • checkbox for the option to rank output by percent coverage
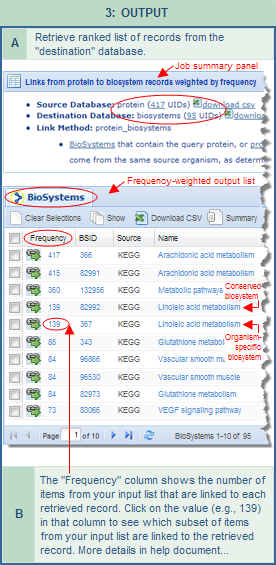
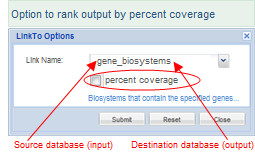
Percent Coverage: Some "LinkTo" options, such as links from the Gene, Protein, and PubChem databases to BioSystems, display a checkbox for "Percent Coverage." If you select the checkbox, the FLink output will rank output by that value rather than by "Frequency." The "Frequency" column will still be present in the output and can still be used to re-sort the data by that value, if desired. Details about both sorting methods are provided in the section on "ranked list of records."
          (Illustrated examples of pathways ranked by percent coverage vs. pathways ranked by frequency are provided in the "How To" file on "Start with a gene expression study and retrieve a ranked list of pathways (biosystems) in which the up- or down-regulated genes are involved.")


      • icon for the Download CSV function, which saves all items in the current folder tab, whether or not they have been selected with checkboxes. Download CSV file -- Download the data displayed in the folder tab as a comma separated value (CSV) file. This function acts upon all the records in the display, whether or not their checkboxes are activated.

        • Tip: The csv file is in Unicode (UTF-8) format. If you plan to import the file into a spreadsheet program, you might need to specify the Unicode (UTF-8) format during the import process.

        • For example, if you plan to import the file into Excel, follow the instructions at Tune Help (https://help.tune.com/marketing-console/how-to-import-a-unicode-csv-to-excel/), starting with step 4, in order to import Unicode properly.

        • Note: If the Unicode (UTF-8) format is not specified during the process of importing the CSV file into the spreadsheet program, certain ASCII characters such as the umlaut (ö), e-acute (é), etc. might not appear correctly.

      • Icon for the Summary function, which displays additional descriptive information for all records, as available, whether or not their checkboxes are activated. Summary -- Display additional descriptive information for all records, as available, whether or not their checkboxes are activated.


    • Close folder tab -- The "X" in the upper right hand corner of a folder tab on the input summary display will close that tab and will delete from the server the UID list it currently contains. The database tab can be opened again later, if desired, by selecting it from the start menu. A new UID list can then be imported.


    • Start Over -- Pressing the "Start Over" button at the bottom of the input summary display will close all of the folder tabs and will delete from the server the UID lists they currently contain. If you prefer to close only one of the "start" databases and delete its UID list, simply close the appropriate folder tab.


  • View output back to top

    • After you have used the "LinkTo" function to select a destination database, an output display will appear that shows a ranked list of records from the destination database you chose. More details about that display are provided in the output section below.


Search Entrez → link to FLink icon FLink back to top

A second way to use FLink is to start by searching an Entrez database of interest (from the list of supported databases) and then link to FLink from the search results page. The name an appearance of the link might vary. For example:

If you start a search in the GEO Profiles database, the search results will display a "Find Pathways" button in the right-hand margin of the page. That button performs a multiple-step FLink operation which retrieves a ranked list of pathways associated with the gene expression studies. (A detailed example is provided in the "How To" file on "Start with a gene expression study and retrieve a ranked list of biosystems in which the up- or down-regulated genes are involved."

If you start a search in some other databases, the link to FLink will appear on the search results page as an FLink icon icon and will retrieve the related data from the destination database as a ranked list.

Important notes about displays that use the FLink icon FLink icon:

  • clicking on the link name (e.g., "BioSystems") that appears beside the icon will open the records directly in the destination database, where records will be listed in the default sort order for that database. In contrast, clicking on the FLink icon (FLink icon) will display the records as a frequency-weighted list in the FLink tool.


  • Only a subset of supported databases currently contain FLink icon FLink icons on their search results page at the time of FLink's initial release. If you do an Entrez search in a supported database and the search results page does not display any FLink icons, you can still access frequency-weighted lists of related data for your search results. This is because your search results are temporarily stored in Entrez History (for up to 8 hours after your last activity in a given Entrez database) and they can be imported as a UID list directly into FLink. To do this, open the FLink icon FLink home page, choose the database you just searched as the starting point, then select "Input from Entrez History" in the dialog box. Your search results will be imported into FLink and you can then use the "LinkTo" menu to select the desired destination database and data type, as described above.

Maximum input back to top

FLink icon FLink can accept up to 100,000 UIDs as input (and can display up to 100,000 associated UIDs from the destination database on the output page).


Output back to top

| job summary | ranked list of records | folder tab functions | maximum output |

Regardless of the input method you have used (direct input of UID list into FLink  or  search an Entrez database and then link to FLink), the output display will include the described components below.

FLink currently displays a single folder tab on the output page, representing the destination database you have most recently selected. The URL for the display includes a randomly assigned Job ID. You can save that URL to a file and use it anytime over the next 24 hours to view the display again. If you would like to retrieve records from a different destination database than the one currently being displayed, use the browser's back button to return to your input summary display (or to your Entrez search results page, if that's how you entered FLink), then use the LinkTo function (or the FLink icon on your Entrez search results page) to select a new destination database/data type. A new Job ID will be assigned to each LinkTo operation you do. The URLs for those output displays can also be saved and used over the next 24 hours.


Job summary back to top

Example of the FLink output display, showing a frequency-weighted list of biosystems that contain proteins from your input list. The output display is the last step of a three step process in using the tool. Click on this image to see the complete illustration of the three steps in using FLink, featured in the Quick Start Guide.
The top of the output display shows a blue header bar that says:
Icon from the job summary panel title bar displayed on a FLink output page. Links from [source database name] to [destination database name] records weighted by frequency.
Click on the triangle image of triangle button used to expand the job summary panel on the FLink output display at end of that header bar to expand the job summary panel (which is minimized by default) and view the job details, such as:
  • source database -- the name of the database in which you started and the number of UIDs that were processed by FLink. (The "download csv" option can be used to download a comma-separated value file of the UIDs in your input list, along with the descriptive information about each UID that was retrieved from the source database.)


  • destination database -- the name of the database to which you chose to link and the number of records (UIDs) that were retrieved. (The "download csv" option can be used to download a comma-separated value file of the UIDs that were retrieved by FLink from the destination database. The file will also include the information about each UID that is displayed in the corresponding folder tab for that destination database.)


  • link method -- indicates the relationship between the data in your input list and the data that were retrieved from the destination database. It includes:


    • brief description of the method that was used to create links between items from your input list and items in the destination database, and cross-references to documents that provide additional detail, as available.


    • download one-to-one mapping in csv -- This function downloads a comma-separated value (csv) file that lists the one-to-one correspondences between unique identifiers (UIDs) in the source and destination databases. This is an alternative output format that allows you to download the underlying link data in raw form, grouped by the UID of input items rather than sorted as a frequency-weighted list.

      An an example, open FLink and input a list of proteins, then link to the associated list of genes. On the output display, expand the job summary panel to view its details, then click on "download one-to-one mapping in csv" to generate a file that lists each protein UID and the specific gene ID(s) to which it is linked.

      Note that some items from your input list might not have any links to items in the destination database. The csv file will only include UIDs from your input list that have links to at least one item in the selected destination database. If an item from your input list has links to multiple items in the destination database, each pairwise linkage will be listed on a separate row of the csv file.


  • multiple step Flink operation -- Some FLink operations can traverse across several databases. In that case, the job summary panel will display the details for each step of the operation and allow you to download, if desired, the list of input and output items for each step.

    • For example, the "Find Pathways" link in the right-hand margin of a GEO Profiles search results page performs a FLink operation that traverses across three databases: GEO Profiles → Genes → BioSystems. That operation is done in two steps:

      1. Step 1: GEO Profiles → Genes

      2. Step 2: Genes → BioSystems

      The output list (destination database) from one step serves as the input list (source database) for the next step.


    • The bottom of the FLink display will contain a folder tab with the results from the destination database of each step. In this example, the results of Step 1 will be shown in a "Genes" folder tab, and the results of Step 2 will be shown in a "BioSystems" folder tab. Note that the "Frequency" column in each folder tab indicates the number of items from that step's input list that are linked to each record retrieved from the destination database.

    • This example is discussed in more detail in the "How To" file on "Start with a gene expression study and retrieve a ranked list of biosystems in which the up- or down-regulated genes are involved."


Ranked list of records back to top

The folder tab in the output display shows the name of the destination database to which you have linked and the items found to be associated with your initial set of records (that were specified in your input UID list or found by your Entrez search). The following information is provided for each record retrieved from the destination database. By default, output is ranked by Frequency, and can also be ranked by Percent (%) Coverage, if that option is available for a particular destination database.
  • UID and description of each retrieved record -- the unique identifier (UID) of each record in the destination database that is associated with any records from your input list, along with descriptive information.


  • Frequency column indicates rank -- The Frequency column shows the number of items from your input list that are linked to each retrieved record. Click on the value in that column to see which subset of items from your input list are linked to the retrieved record.

    • For example, if your input list contains 20 GeneIDs, and 12 of those are involved in a given biosystem, the frequency column will display a value of 12. Clicking on the number "12" will open a list of the 12 genes in the Entrez Gene database.

    • Note: In the case of a multiple step FLink operation (e.g., GEO Profiles → Genes → BioSystems), the FLink output will display one folder tab with the results of each step (Step 1: GEO Profiles → Genes; Step 2: Genes → BioSystems). The "Frequency" column in each folder tab indicates the number of items from that step's input list that are linked to each record retrieved from the destination database.


  • Max Frequency column indicates relative size of a record in the destination database -- The Max Frequency column is available for select destination databases such as BioSystems. It is an indicator of the relative size of a record in the destination database in that it shows the total number of items (of the same type as your input list) that are linked to the record. It also represents the maximum value that can appear in the frequency column and is used to calculate the percent (%) coverage. Note that the "Max Frequency" column is displayed only if you select the option to view the "percent coverage" after you input your data file and select your "LinkTo" destination.

    • For example, if a biosystem record has links to a total of total of 48 Entrez Gene records, 100 Entrez Protein sequence records, and 35 PubChem (small molecule) records, the "Max Frequency" column will display a value of 48 if your input file contained a list of GeneIDs, a value of 100 if your input file contained a list of protein sequence IDs, or a value of 35 if your input file contained a list of CIDs (PubChem Compound IDs). Those values represent the maximum number of genes, proteins, or small molecules from any input list that can have links to this biosystem.


  • Percent (%) Coverage column indicates the degree to which your input list covers the scope of each retrieved record -- This column is available for select destination databases such as BioSystems, and is calculated as:
    (Frequency ÷ MaxFrequency) × 100 = % Coverage
    Note that this column is displayed only if you select the option to view the "percent coverage" after you input your data file and select your "LinkTo" destination. It is used as an alternative method for ranking output.

    • For example, if 12 GeneIDs from your input list are linked to a particular biosystem record, and if the biosystem record has links to a total of 48 GeneIDs in the Entrez Gene database, then the percent coverage of that biosystem record by your input list will be:
      (Frequency ÷ MaxFrequency) × 100 = % Coverage
      (12 ÷ 48) × 100 = 25%


Illustrated examples of pathways ranked by frequency vs. percent coverage are provided in the "How To" file on "Start with a gene expression study and retrieve a ranked list of pathways (biosystems) in which the up- or down-regulated genes are involved":

Folder tab functions back to top

  • icon for the Clear Selections function, which clears all selections on all pages within the folder tab. Clear Selections -- Clear of the all checkboxes that have been selected on all pages within the folder tab. (Note: It is possible to select items on multiple pages (1 of 10, 1 of 10, 9 of 10, etc.) within a folder tab, and the "clear selections" function will clear the checkboxes on all the pages.)


  • icon for the Show function, which displays all (default) or selected records in the Entrez database. Show records in source database -- Retrieve all (default) or selected items from the corresponding Entrez database. This function will temporarily take you out of FLink and into that Entrez database, but you can use the browser's back button to return to the FLink display.


  • icon for the Download CSV function, which saves all items in the current folder tab, whether or not they have been selected with checkboxes. Download CSV -- Download the data displayed in the folder tab as a comma separated value (CSV) file. This function acts upon all the records in the display, whether or not their checkboxes are activated. This function is also available from the job summary panel.

    • Tip: The CSV file is in Unicode (UTF-8) format. If you plan to import the file into a spreadsheet program, you might need to specify the Unicode (UTF-8) format during the import process.

    • For example, if you plan to import the file into Excel, follow the instructions at Tune Help (https://help.tune.com/marketing-console/how-to-import-a-unicode-csv-to-excel/), starting with step 4, in order to import Unicode properly.

    • Note: If the Unicode (UTF-8) format is not specified during the process of importing the CSV file into the spreadsheet program, certain ASCII characters such as the umlaut (ö), e-acute (é), etc. might not appear correctly.


  • Icon for the Summary function, which displays additional descriptive information for all records, as available, whether or not their checkboxes are activated. Summary -- Display additional descriptive information for all records, as available, whether or not their checkboxes are activated.


Maximum output back to top

FLink icon FLink can display up to 100,000 associated UIDs from the destination database on the output page (and can accept up to 100,000 UIDs as input).


Supported Databases back to top

A subset of Entrez databases is supported in FLink back to top

FLink icon FLink can be used to find associations among data in the following subset of Entrez databases:
BioSystems database icon BioSystems
Conserved Domain Database (CDD) icon Conserved Domain Database (CDD)
Gene database icon Gene
Protein database icon Protein
PubChem BioAssay database icon PubChem BioAssay
PubChem Compound database icon PubChem Compound
PubChem Substance database icon PubChem Substance
PubMed database icon PubMed
Structure (Molecular Modeling Database, MMDB) icon Structure (Molecular Modeling Database, MMDB)
Any one of them can be used as a source database or destination database if you start on the FLink icon FLink home page and input a UID list directly into the tool.

Link Names represent the available data types back to top

The types of data you can retrieve (as frequency-weighted lists) via FLink depend on which database you started in. The options available for any given database are listed in the "LinkTo" dialog box on FLink's input summary display (illustrated example), which appears after you input a UID list directly into FLink. The data types are represented as
"Link Names" in the format:

sourcedatabase_destinationdatabase (e.g., "protein_biosystems," "protein_cdd," "protein_gene," "protein_structure")

or

sourcedatabase_destinationdatabase_linkmethod (e.g., "biosystems_pcassay_active," "biosystems_pcassay_target"), if multiple link types are available in a given destination database.
You can select a link name from the menu to read its description in the "LinkTo Options" dialog box and continue browsing the various link names in that way. Once you've found a link of interest, press the "Submit" button to retrieve that data type.

FLink icon FLink icon on Entrez search results pages back to top

If you prefer to start with an Entrez search rather than upload a UID list directly into FLink, you can click on FLink icon FLink icons, when present, on the Entrez search results page to access the tool. Please note that only a subset of supported databases currently contain FLink icon FLink icons/links on their search results page at the time of FLink's initial release. If you do an Entrez search in a supported database and the search results page does not display any FLink icons, you can still access frequency-weighted lists of related data for your search results. To do that, just open the FLink home page, select the database you searched from the "choose database to start" menu, and select "Input from Entrez History" as the input method. Your search results will be imported into FLink and you can then use the "LinkTo" menu to select the desired destination database and data type, as described above.


References back to top


Citing FLink: back to top

To cite FLink, please use the following format, based on Citing Medicine: The NLM Style Guide for Authors, Editors, and Publishers (2nd ed., 2007), Chapter 24: Databases/Retrieval Systems on the Internet.

FLink: Frequency weighted links [Internet]. Bethesda (MD): National Library of Medicine (US), National Center for Biotechnology Information. 2010 - [cited YYYY MMM DD]. Available from: https://www.ncbi.nlm.nih.gov/Structure/flink/flink.cgi

Revised 7 December 2021